Ubuntu 20.04 eGPU CUDA 开发环境搭建
因为要用学习深度学习的剪枝量化,看到 AI Model Efficiency Toolkit (AIMET)
最近更新还行,然后就去安装,发现只支持 Linux 系统,Ubuntu 的系统也有要求,然后加支持特定版本的 CUDA 以及特定版本的 Torch 和 Tensorflow,然后就有了这一篇记录。坑还是挺多的,记录一下方便后续搭建。
安装系统
安装完 Ubuntu 20.04 后重启,如果看到如下提示升级 22.04,不能升级,点击 Don't Upgrade。
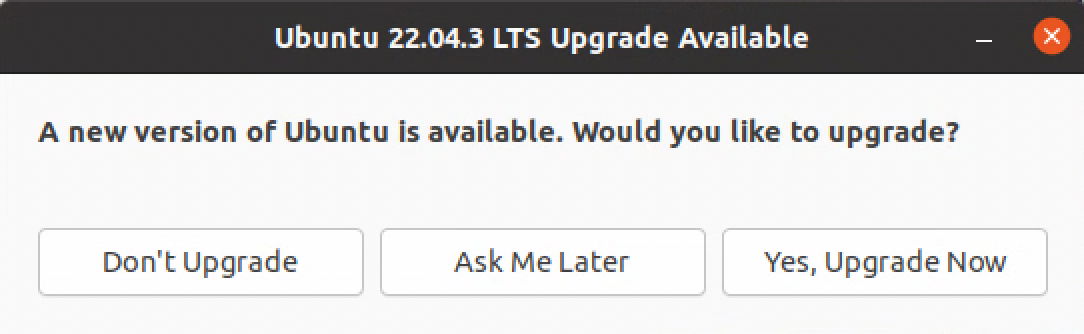
并且点击 ok 确认不进行升级。
安装 no-machine
需要预先准备好离线 deb 安装包,并用 dbkg 进行本地安装如下【比较好的是安装完设置好了自动重启】:
mintisan@mintisan-NUC9VXQNX:~/UbuntuApps$ sudo dpkg -i ./nomachine_8.11.3_4_amd64.deb
[sudo] password for mintisan:
Selecting previously unselected package nomachine.
(Reading database ... 180009 files and directories currently installed.)
Preparing to unpack ./nomachine_8.11.3_4_amd64.deb ...
Unpacking nomachine (8.11.3-4) ...
Setting up nomachine (8.11.3-4) ...
NX> 700 Starting installation at: Sun, 19 May 2024 21:55:08.
NX> 700 Using installation profile: Ubuntu.
NX> 700 Installation log is: /usr/NX/var/log/nxinstall.log.
NX> 700 Installing nxrunner version: 8.11.3.
NX> 700 Installing nxplayer version: 8.11.3.
NX> 700 Installing nxnode version: 8.11.3.
NX> 700 Installing nxserver version: 8.11.3.
NX> 700 Installation completed at: Sun, 19 May 2024 21:55:18.
NX> 700 NoMachine was configured to run the following services:
NX> 700 NX service on port: 4000
然后在打开 NoMachine Server 可以看到本地的地址以及端口如下:
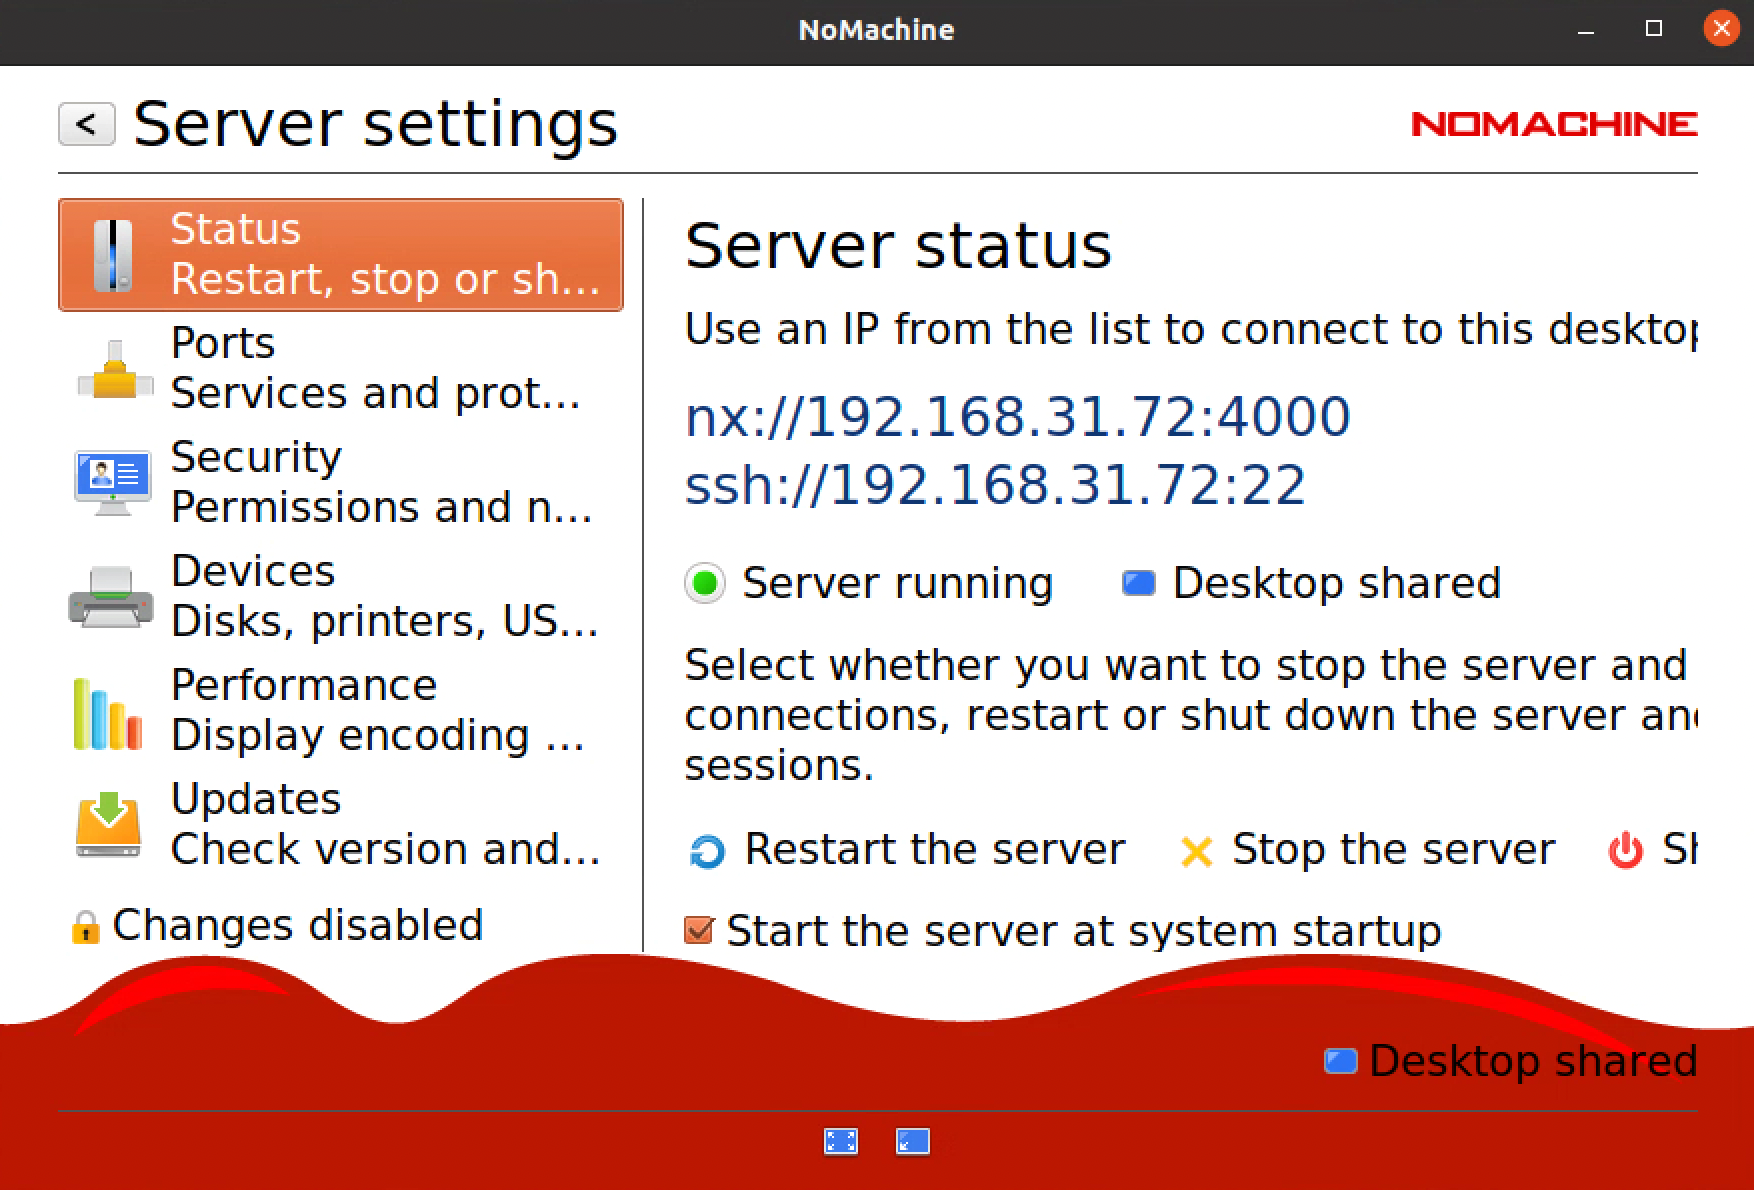
本地连接,并用安装时候的账号和密码登录即可。
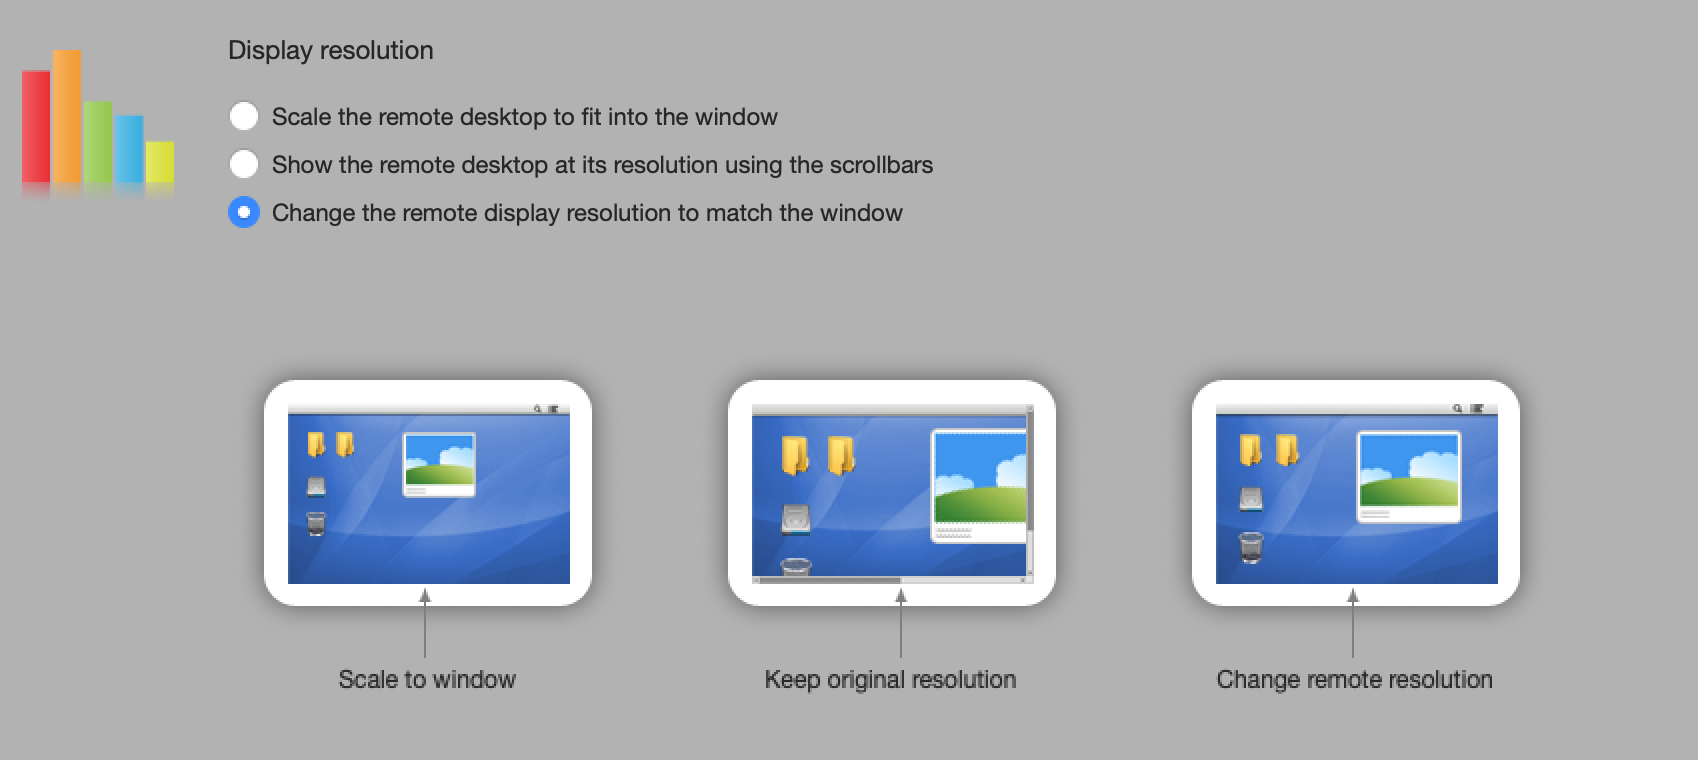
注意在显示的时候需要适应本地窗口分辨率如下,否则会导致桌面显示不全。
安装 tailscale
如果不安装 tailscale ,则终端啥的下载很慢,如下所示:
【当然也可以换源,不过后面还是需要全局翻墙,早换早省心】
mintisan@mintisan-NUC9VXQNX:~/UbuntuApps$ sudo apt-get update -y
Hit:1 http://security.ubuntu.com/ubuntu focal-security InRelease
Err:2 http://cn.archive.ubuntu.com/ubuntu focal InRelease
  Temporary failure resolving 'cn.archive.ubuntu.com'
Err:3 http://cn.archive.ubuntu.com/ubuntu focal-updates InRelease
  Temporary failure resolving 'cn.archive.ubuntu.com'
Err:4 http://cn.archive.ubuntu.com/ubuntu focal-backports InRelease
  Temporary failure resolving 'cn.archive.ubuntu.com'
Reading package lists... Done
W: Failed to fetch http://cn.archive.ubuntu.com/ubuntu/dists/focal/InRelease  Temporary failure resolving 'cn.archive.ubuntu.com'
W: Failed to fetch http://cn.archive.ubuntu.com/ubuntu/dists/focal-updates/InRelease  Temporary failure resolving 'cn.archive.ubuntu.com'
W: Failed to fetch http://cn.archive.ubuntu.com/ubuntu/dists/focal-backports/InRelease  Temporary failure resolving 'cn.archive.ubuntu.com'
W: Some index files failed to download. They have been ignored, or old ones used instead.
安装 tailscale 需要登录 tailscale,而我的 tailscale 是用 Google 作为账号,那么就又到了一个鸡生蛋,蛋生鸡的时候。只能借助局域网内其他的代理来让浏览器可以登录 Google。设置本地代理如下:
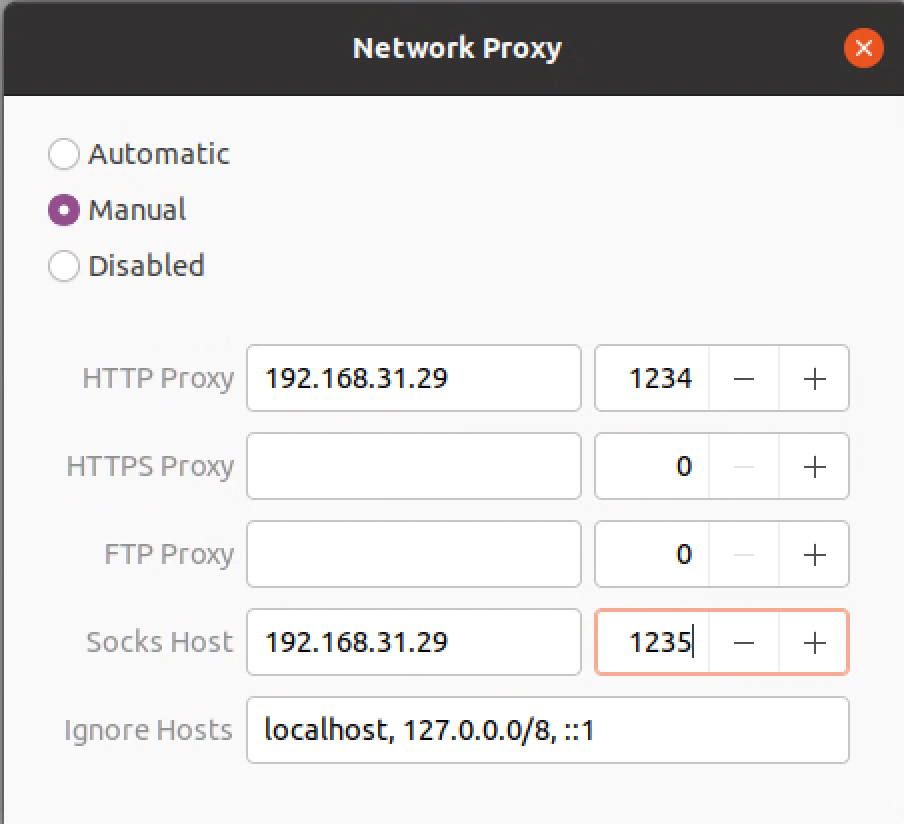
注:我用的手机端的 SurfBoard 来进行代理,PC 端的 Clash 也可以,也就支持局域网代理中转的都是可以的。当然如果你有全局科学上网环境,也是可以的。
此时,就可以在 Chrome 端登录 tailscale 账号了。接下来,用命令行安装 tailscale 如下【需要预先安装 curl 等常用工具】:
mintisan@mintisan-NUC9VXQNX:~/UbuntuApps$ curl -fsSL https://tailscale.com/install.sh | sh

Command 'curl' not found, but can be installed with:

sudo snap install curl  # version 8.1.2, or
sudo apt  install curl  # version 7.68.0-1ubuntu2.20

See 'snap info curl' for additional versions.
mintisan@mintisan-NUC9VXQNX:~/UbuntuApps$ sudo apt-get install openssh-server tmux git zsh neofetch htop vim python3-pip wget curl hwinfo -y
...
mintisan@mintisan-NUC9VXQNX:~/UbuntuApps$ curl -fsSL https://tailscale.com/install.sh | sh
Installing Tailscale for ubuntu focal, using method apt
...
Setting up tailscale (1.66.3) ...
Created symlink /etc/systemd/system/multi-user.target.wants/tailscaled.service → /lib/systemd/system/tailscaled.service.
+ [ false = true ]
+ set +x
Installation complete! Log in to start using Tailscale by running:

sudo tailscale up
mintisan@mintisan-NUC9VXQNX:~/UbuntuApps$ sudo tailscale up


To authenticate, visit:

	https://login.tailscale.com/a/1aeaea1801138c

Success.
Some peers are advertising routes but --accept-routes is false
mintisan@mintisan-NUC9VXQNX:~/UbuntuApps$
输入 sudo tailscale up 再打开输出的链接,完成新设备到账号的绑定,绑定后就可以通过以下命令完成使用外部节点,完成所有的流量通过 VPN 来中专访问。
查看可以用作 exist-node 的 IP 地址:
mintisan@mintisan-NUC9VXQNX:~/UbuntuApps$ tailscale ip
100.97.189.1
fd7a:115c:a1e0::9a01:bd01
mintisan@mintisan-NUC9VXQNX:~/UbuntuApps$ tailscale status
100.97.189.1 ubuntu-nuc9vxqnx fovwin@ linux -
100.70.247.65 bandwagong-768.tail1456b.ts.net ran.thinker@ linux idle; offers exit node
100.85.156.97 gl-mt3000 fovwin@ linux -
100.71.139.27 mac-mini-m1 fovwin@ macOS offline
100.122.227.134 mac-studio fovwin@ macOS -
100.74.183.119 macbook-air-m3 fovwin@ macOS offline
100.88.126.81 macbook-pro-2018 fovwin@ macOS offline
100.70.233.114 nuc13-extreme-980pro fovwin@ windows offline
100.75.92.65 oneplus-a6010 fovwin@ android offline
100.123.114.32 r2s-istoreos fovwin@ linux offline
100.122.151.42 r4s-istoreos fovwin@ linux -
100.95.124.152 racknerd-6e9267-2t fovwin@ linux idle; offers exit node
100.103.22.149 racknerd-f16b55-4t fovwin@ linux idle; offers exit node
100.78.129.159 raspberrypi5 fovwin@ linux -
100.117.50.87 ser-pro-5800-archlinux fovwin@ linux -
100.108.77.59 ser6-pro-vest-windows fovwin@ windows offline
100.80.43.50 tencent-ubuntu-2mbps fovwin@ linux -
100.120.74.6 thinkpad-pibo fovwin@ windows offline
100.110.45.44 vmware-ecg-server fovwin@ linux offline
100.113.135.2 vps-bandwagon-1000g fovwin@ linux idle; offers exit node
100.70.95.62 vps-bandwagon-500g fovwin@ linux idle; offers exit node
100.81.105.47 vps-bandwagon-768g fovwin@ linux idle; offers exit node
100.102.191.33 xiaomi-13 fovwin@ android offline
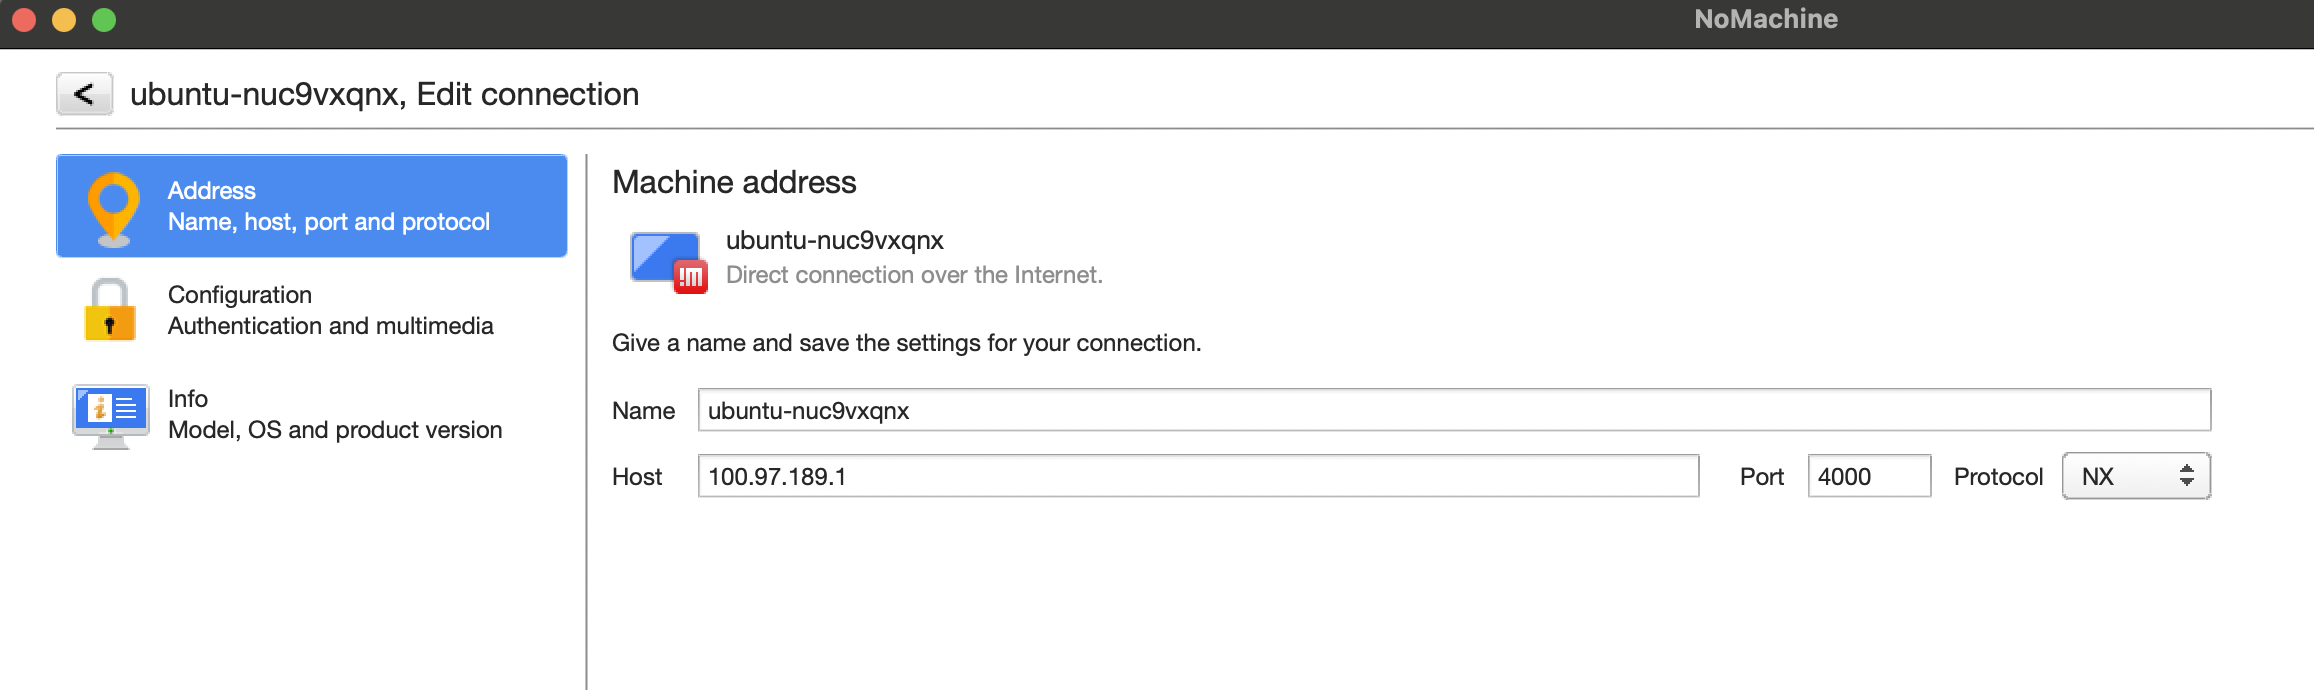
mintisan@mintisan-NUC9VXQNX:~/UbuntuApps$ sudo tailscale up --exit-node=100.113.135.2 --reset
Some peers are advertising routes but --accept-routes is false
再输入以上命令后, no-machine 会自动断开,此时需要在 no-machine 中重新设置 tailscale 的地址如下:
此时在终端就可以看到 ping 通 Google 了,完成了本地全局科学上网。
mintisan@mintisan-NUC9VXQNX:~/UbuntuApps$ ping google.com
PING google.com (172.217.25.174) 56(84) bytes of data.
64 bytes from sin01s16-in-f14.1e100.net (172.217.25.174): icmp_seq=1 ttl=118 time=201 ms
64 bytes from sin01s16-in-f14.1e100.net (172.217.25.174): icmp_seq=2 ttl=118 time=204 ms
^C
--- google.com ping statistics ---
2 packets transmitted, 2 received, 0% packet loss, time 1000ms
rtt min/avg/max/mdev = 200.994/202.248/203.503/1.254 ms
然后把网络代理也可以关掉了。
安装系统常用工具
安装 oh-my-zsh 如下,并设置 zsh 为默认 shell:
mintisan@mintisan-NUC9VXQNX:~/UbuntuApps$ sh -c "$(wget https://raw.githubusercontent.com/ohmyzsh/ohmyzsh/master/tools/install.sh -O -)"
Cloning Oh My Zsh...
remote: Enumerating objects: 1416, done.
remote: Counting objects: 100% (1416/1416), done.
remote: Compressing objects: 100% (1361/1361), done.
remote: Total 1416 (delta 47), reused 1091 (delta 25), pack-reused 0
Receiving objects: 100% (1416/1416), 3.21 MiB | 6.79 MiB/s, done.
Resolving deltas: 100% (47/47), done.
From https://github.com/ohmyzsh/ohmyzsh
 * [new branch]      master                   -> origin/master
 * [new branch]      update/plugins/wd/0.3.0  -> origin/update/plugins/wd/0.3.0
 * [new branch]      update/plugins/wd/v0.7.0 -> origin/update/plugins/wd/v0.7.0
Branch 'master' set up to track remote branch 'master' from 'origin'.
Already on 'master'
/home/mintisan/UbuntuApps

Looking for an existing zsh config...
Using the Oh My Zsh template file and adding it to /home/mintisan/.zshrc.

Time to change your default shell to zsh:
Do you want to change your default shell to zsh? [Y/n] Invalid choice. Shell change skipped.
         __                                     __
  ____  / /_     ____ ___  __  __   ____  _____/ /_
 / __ \/ __ \   / __ `__ \/ / / /  /_  / / ___/ __ \
/ /_/ / / / /  / / / / / / /_/ /    / /_(__  ) / / /
\____/_/ /_/  /_/ /_/ /_/\__, /    /___/____/_/ /_/
                        /____/                       ....is now installed!


Before you scream Oh My Zsh! look over the `.zshrc` file to select plugins, themes, and options.

• Follow us on Twitter: @ohmyzsh
• Join our Discord community: Discord server
• Get stickers, t-shirts, coffee mugs and more: Planet Argon Shop

➜  UbuntuApps chsh -s $(which zsh)

Password:
➜  UbuntuApps
将 open-ssh server 加入开机自启动,方便后续通过 ssh 命令行访问本机:
➜  UbuntuApps sudo systemctl status ssh

● ssh.service - OpenBSD Secure Shell server
     Loaded: loaded (/lib/systemd/system/ssh.service; enabled; vendor preset: enabled)
     Active: active (running) since Sun 2024-05-19 22:19:07 CST; 21min ago
       Docs: man:sshd(8)
             man:sshd_config(5)
   Main PID: 18109 (sshd)
      Tasks: 1 (limit: 76667)
     Memory: 1.0M
     CGroup: /system.slice/ssh.service
             └─18109 sshd: /usr/sbin/sshd -D [listener] 0 of 10-100 startups

5月 19 22:19:07 mintisan-NUC9VXQNX systemd[1]: Starting OpenBSD Secure Shell server...
5月 19 22:19:07 mintisan-NUC9VXQNX sshd[18109]: Server listening on 0.0.0.0 port 22.
5月 19 22:19:07 mintisan-NUC9VXQNX sshd[18109]: Server listening on :: port 22.
5月 19 22:19:07 mintisan-NUC9VXQNX systemd[1]: Started OpenBSD Secure Shell server.
➜  UbuntuApps sudo systemctl enable ssh

Synchronizing state of ssh.service with SysV service script with /lib/systemd/systemd-sysv-install.
Executing: /lib/systemd/systemd-sysv-install enable ssh
➜  UbuntuApps sudo systemctl restart ssh
安装 Nvidia 驱动环境
此时没有接入 eGPU,输入如下查询显卡设备相关的命令,是没有输出的。
➜  UbuntuApps ls /usr/src | grep nvidia

➜  UbuntuApps hwinfo --gfxcard --short
graphics card:
                       Intel UHD Graphics 630 (Mobile)

Primary display adapter: #34
➜  UbuntuApps
➜  UbuntuApps lspci | grep -i nvidia
此时,输入 poweroff 可以进行关机:
➜ UbuntuApps sudo poweroff
重启后,USB 属于热插拔,但是 eGPU 实验表明属于半个热插拔,可以随着系统启动;也可以系统启动后再启动 eGPU ,再把 USB 接上电脑;但是如果已经处于连接的状态,再拔掉 eGPU ,此时系统会卡死,鼠标键盘都不能动,需要强制系统关机重启恢复。正常连接后再未安装驱动的情况下,可以看到如下情况:
➜  UbuntuApps ls /usr/src | grep nvidia
➜  UbuntuApps lspci | grep -i nvidia
3c:00.0 VGA compatible controller: NVIDIA Corporation GP102 [GeForce GTX 1080 Ti] (rev a1)
3c:00.1 Audio device: NVIDIA Corporation GP102 HDMI Audio Controller (rev a1)
➜  UbuntuApps hwinfo --gfxcard --short
graphics card:
                       nVidia GP102 [GeForce GTX 1080 Ti]
                       Intel UHD Graphics 630 (Mobile)

Primary display adapter: #39
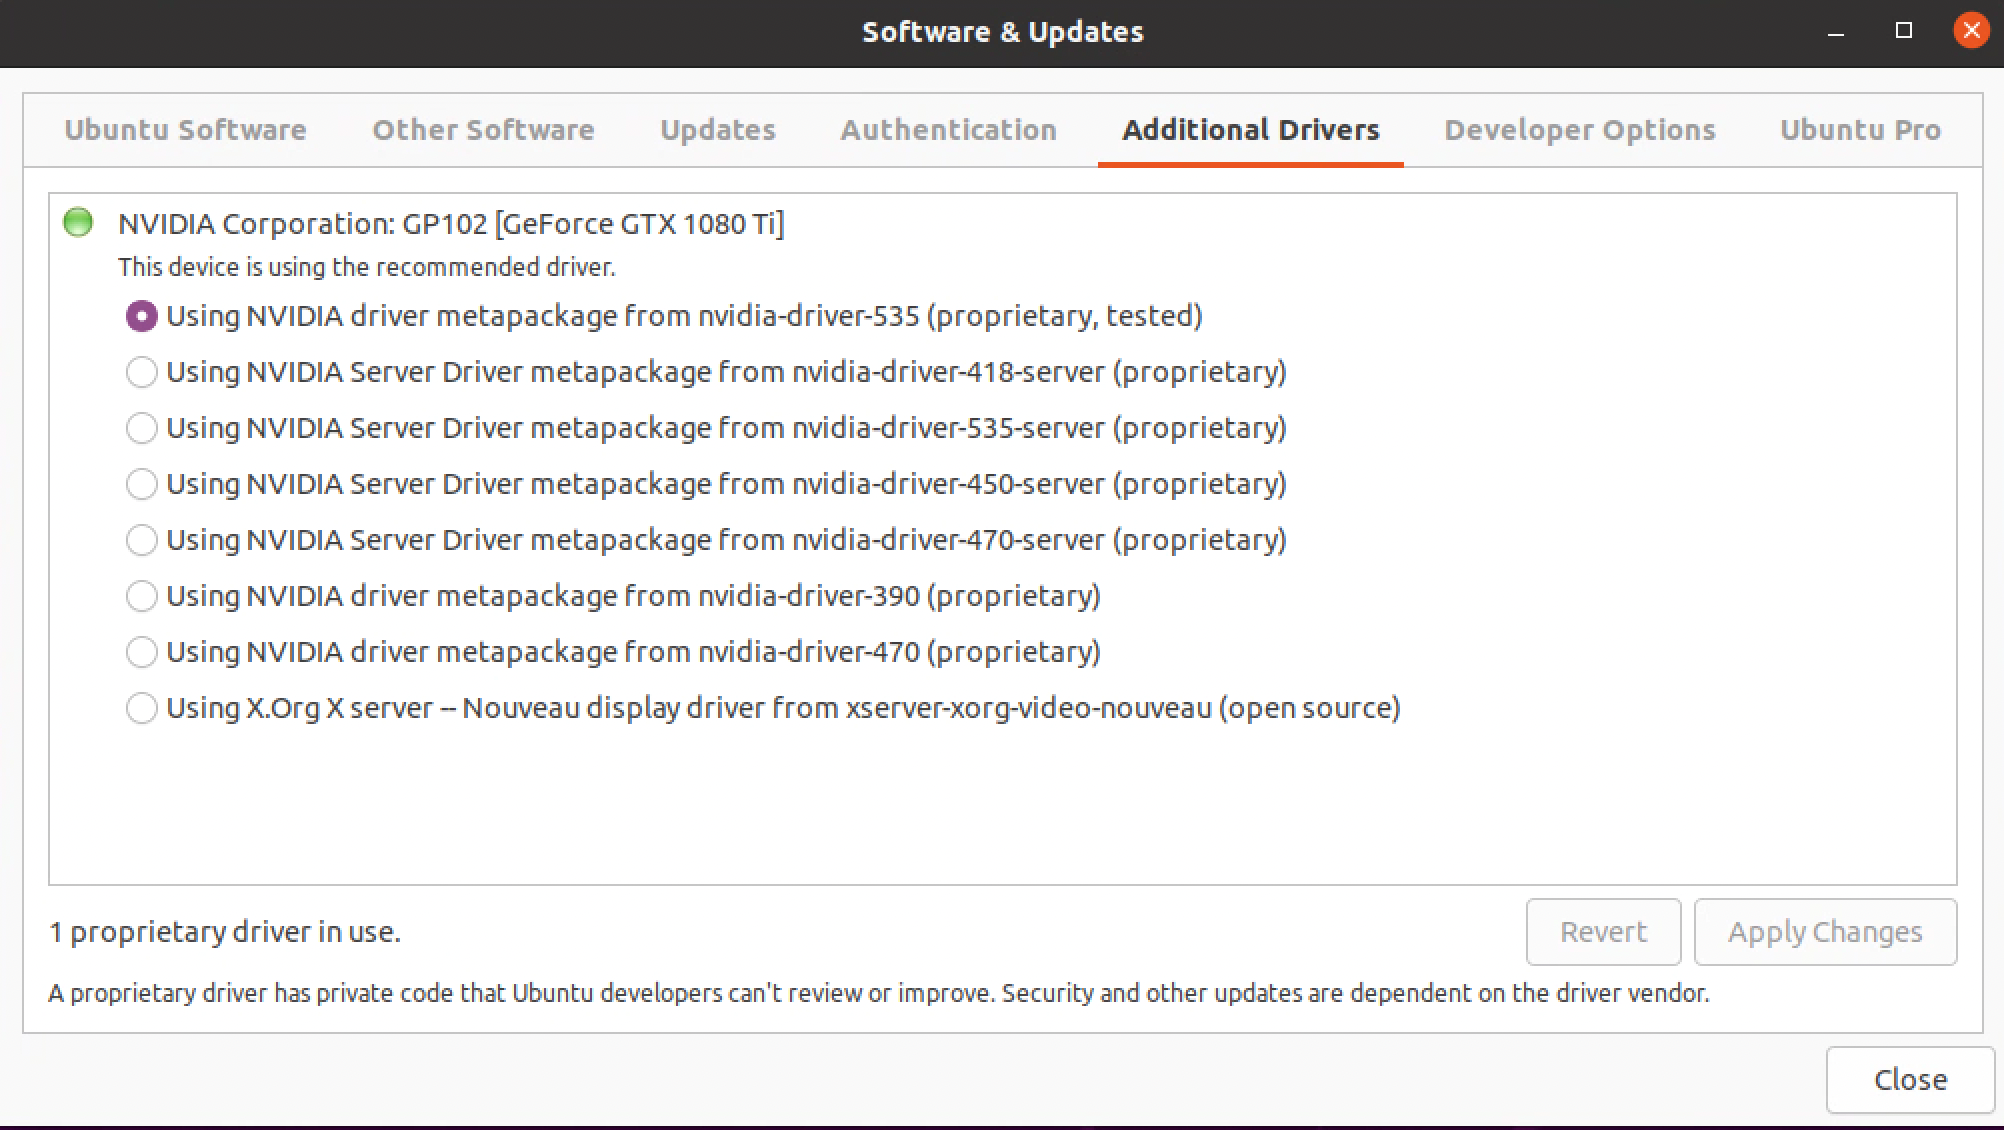
打开限制级驱动,可以看到会自动罗列 nVidia 的驱动列表,如果没有接入显卡,则会显示为空。如果显卡已经被系统识别,就可以看到系统会自动列出可以使用的驱动版本。
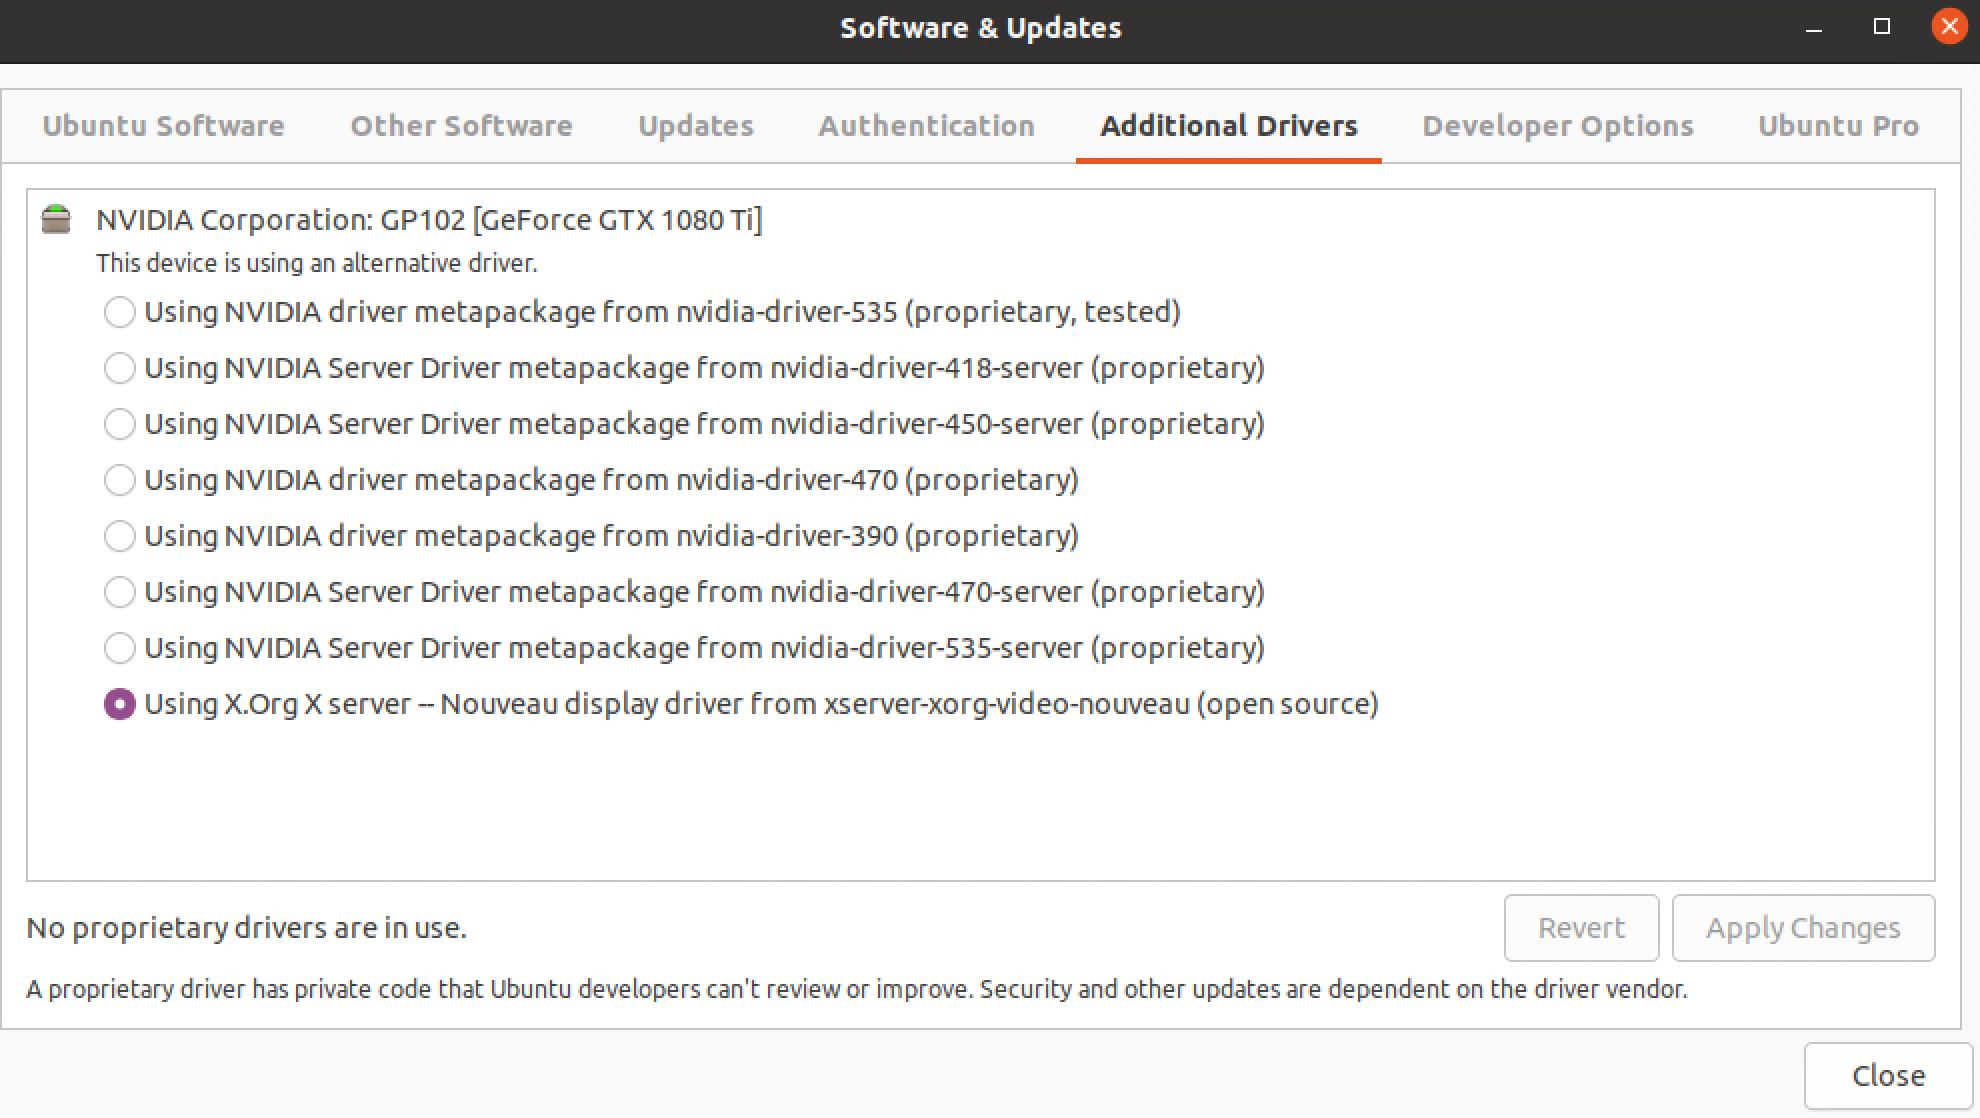
然后拔掉鼠标键盘,外接显示器【最好用 HDMI 诱骗器接上,也就是一定要让后主机看起来有显示器,不然即使连接也无法看到桌面】,插上 eGPU 【我用 NUC9 的下面那个雷电口,这里只是记录下】,并给 eGPU 电源打开。再打开主机的电源启动系统,等待 tailscale 上线。
安装驱动
➜  ~ ls /usr/src | grep nvidia

➜  ~ sudo ubuntu-drivers list
[sudo] password for mintisan:
nvidia-driver-535, (kernel modules provided by linux-modules-nvidia-535-generic-hwe-20.04)
nvidia-driver-450-server, (kernel modules provided by linux-modules-nvidia-450-server-generic-hwe-20.04)
nvidia-driver-390, (kernel modules provided by linux-modules-nvidia-390-generic-hwe-20.04)
nvidia-driver-470, (kernel modules provided by linux-modules-nvidia-470-generic-hwe-20.04)
nvidia-driver-535-server, (kernel modules provided by linux-modules-nvidia-535-server-generic-hwe-20.04)
nvidia-driver-470-server, (kernel modules provided by linux-modules-nvidia-470-server-generic-hwe-20.04)
nvidia-driver-418-server, (kernel modules provided by linux-modules-nvidia-418-server-generic-hwe-20.04)
➜  ~ sudo apt install nvidia-driver-535 -y
...
➜  ~ nvidia-smi
NVIDIA-SMI has failed because it couldn't communicate with the NVIDIA driver. Make sure that the latest NVIDIA driver is installed and running.
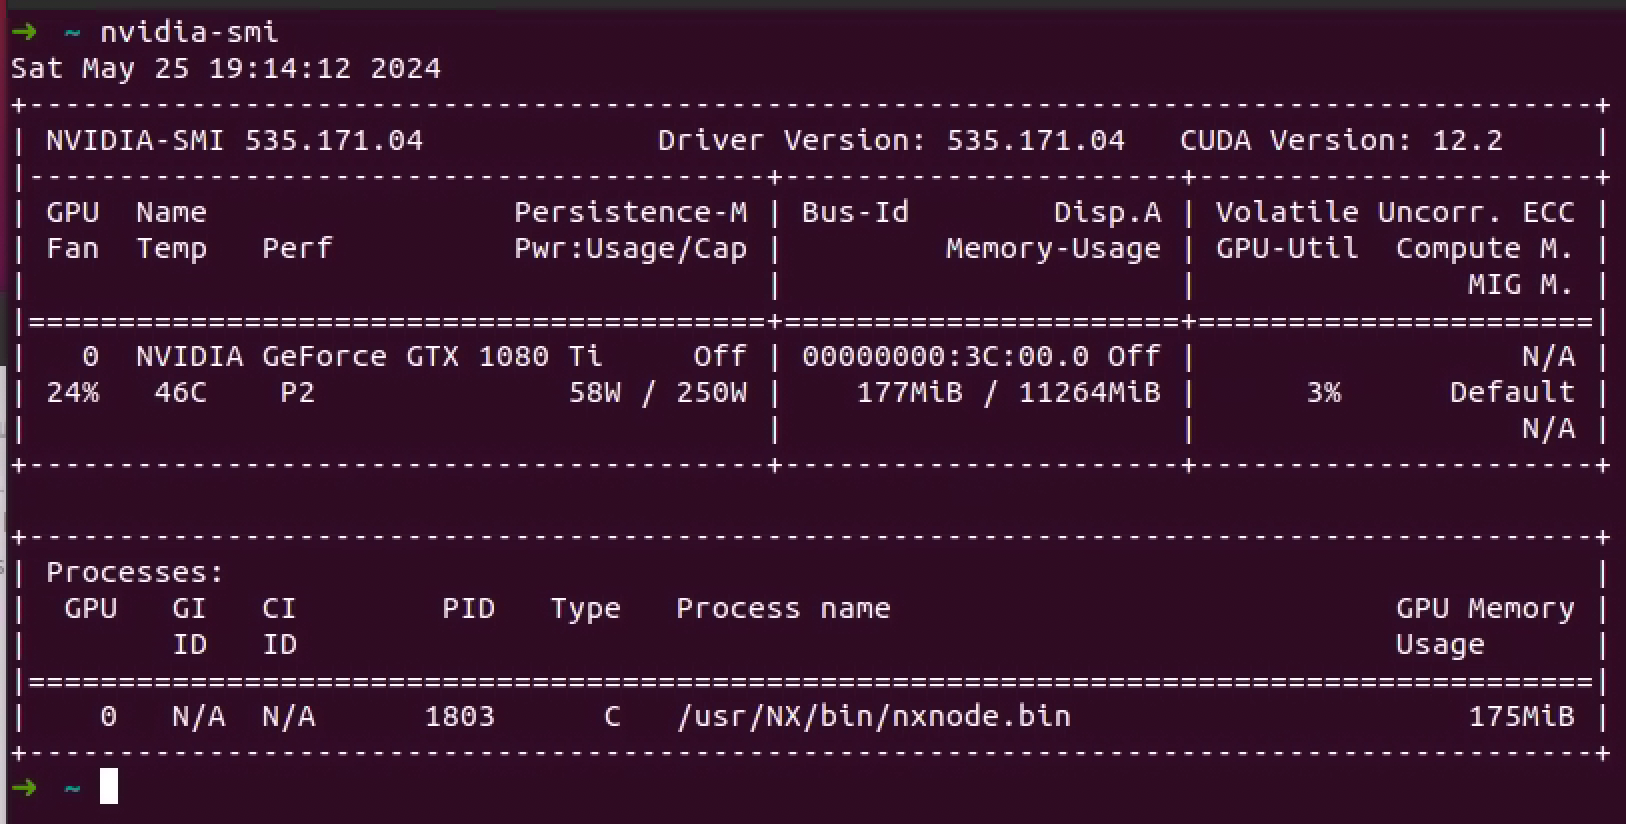
在安装完驱动版本后,可以用 nvidia-smi 可执行程序,但是如上所示提示无法和显卡通信。打开后可以看到已经装上了,并且可以看到 535 的版本最高支持 12.2 CUDA 版本。
安装完需要重启 sudo reboot,然后就可以用命令行 nvidia-smi 看到驱动安装.

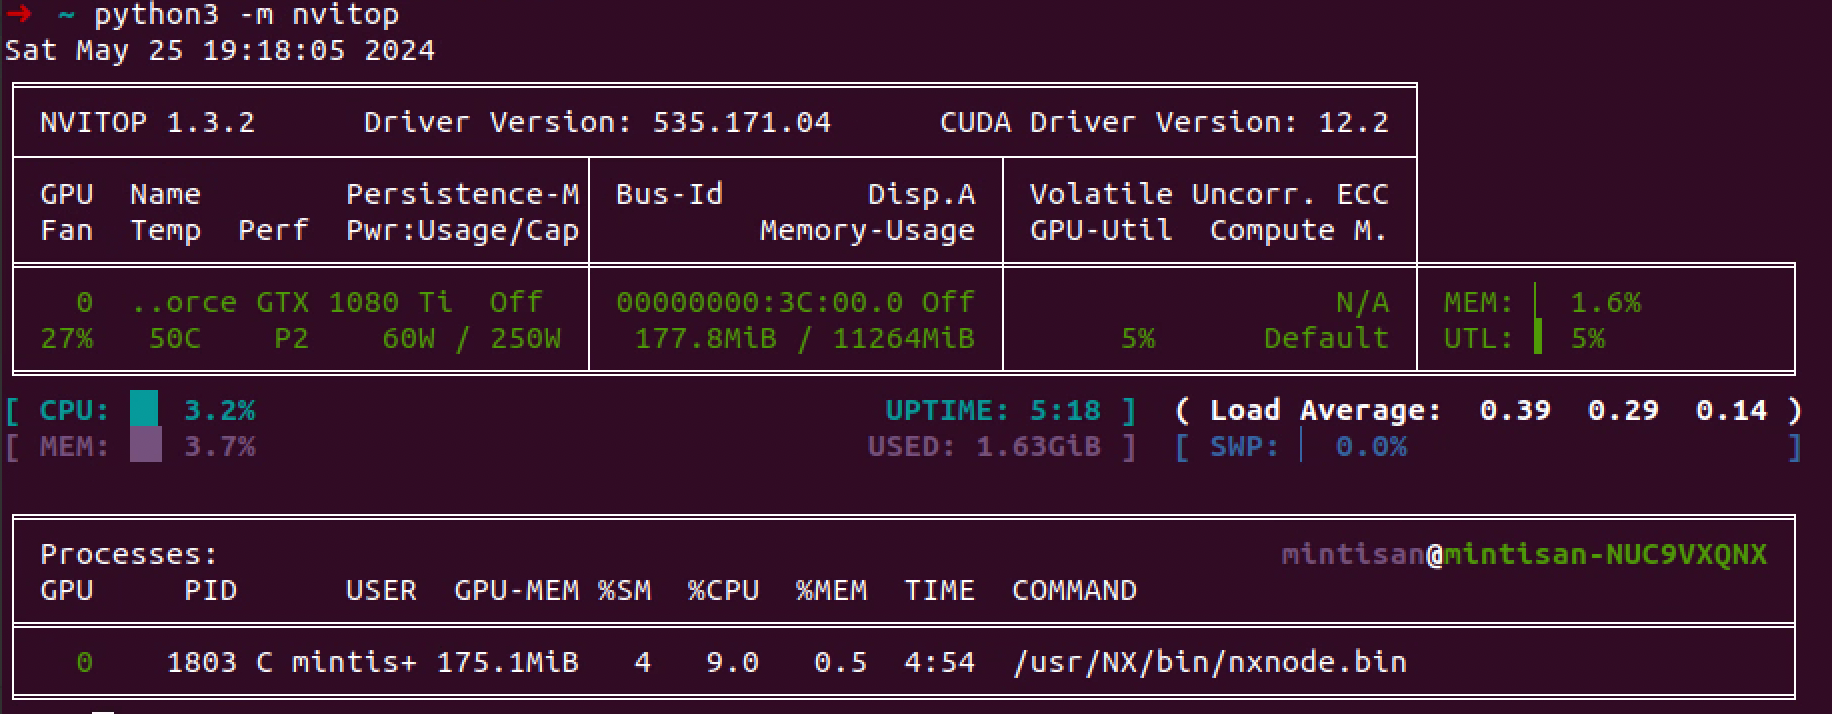
也可以用 nvitop 来看 gpu 的实时状态
➜  ~ pip3 install nvitop
➜  ~ python3 -m nvitop
安装 CUDA
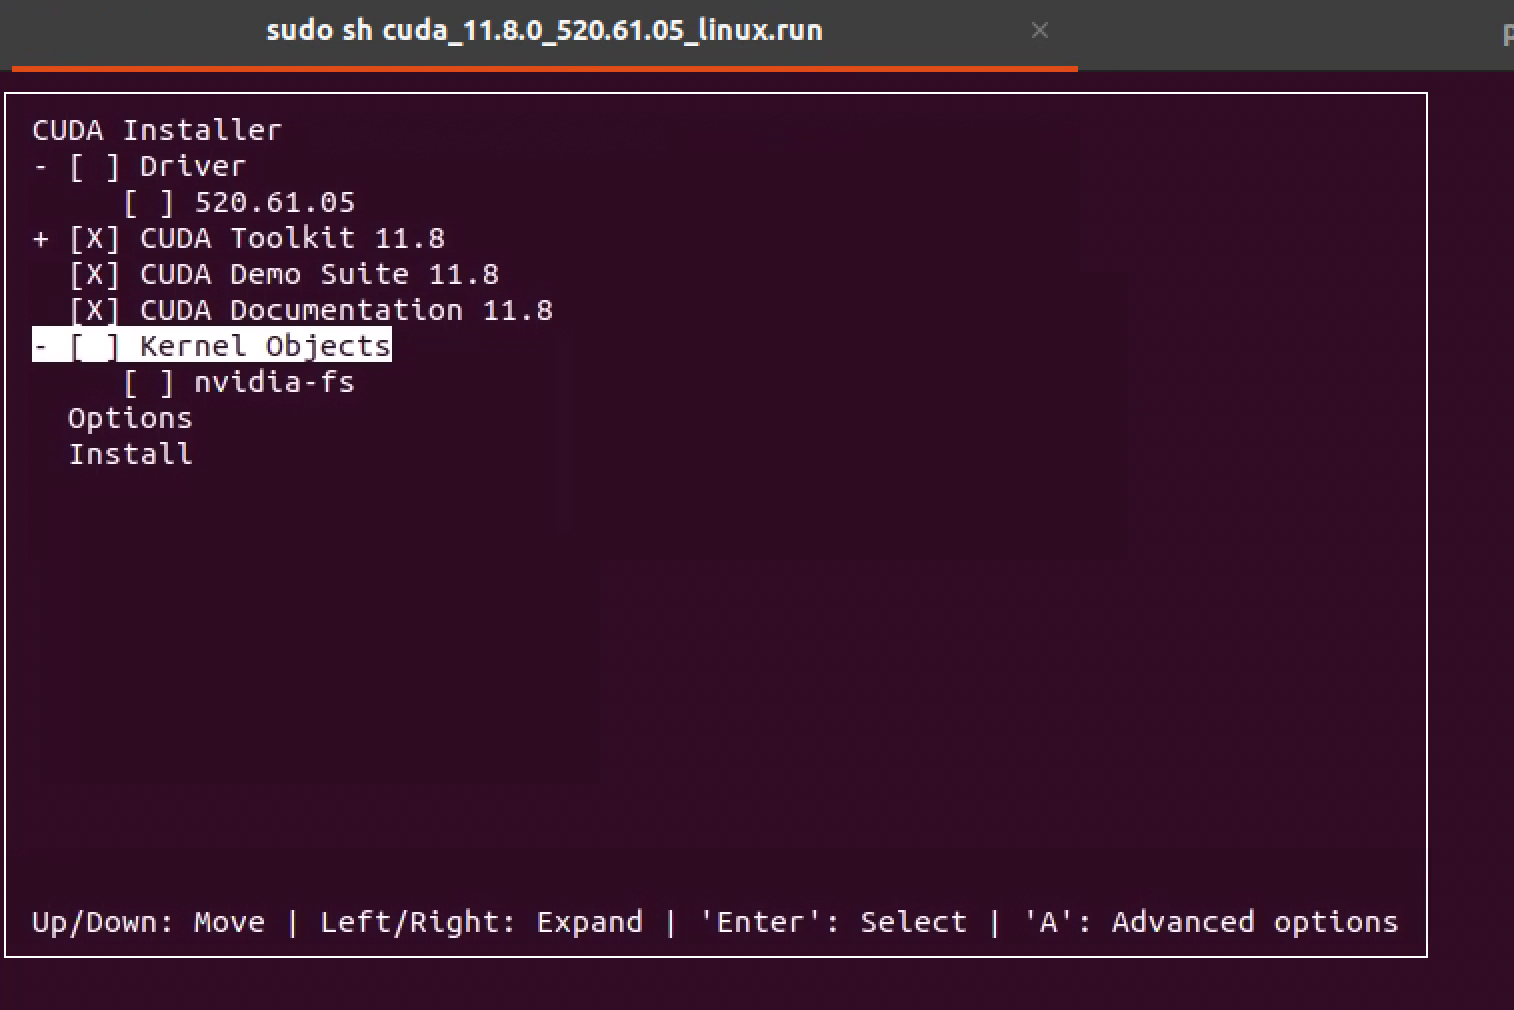
在选项设置时,需要去掉 Driver,只安装 CUDA 相关的内容即可,显示如下:
➜  NVIDIA-DRIVER-CUDA-CUDNN sudo sh cuda_11.8.0_520.61.05_linux.run

[sudo] password for mintisan:
===========
= Summary =
===========

Driver:   Not Selected
Toolkit:  Installed in /usr/local/cuda-11.8/

Please make sure that
 -   PATH includes /usr/local/cuda-11.8/bin
 -   LD_LIBRARY_PATH includes /usr/local/cuda-11.8/lib64, or, add /usr/local/cuda-11.8/lib64 to /etc/ld.so.conf and run ldconfig as root

To uninstall the CUDA Toolkit, run cuda-uninstaller in /usr/local/cuda-11.8/bin
***WARNING: Incomplete installation! This installation did not install the CUDA Driver. A driver of version at least 520.00 is required for CUDA 11.8 functionality to work.
To install the driver using this installer, run the following command, replacing <CudaInstaller> with the name of this run file:
    sudo <CudaInstaller>.run --silent --driver

Logfile is /var/log/cuda-installer.log
安装完后,就将 cuda 的路径添加到 shell 的配置文件中:
export LD_LIBRARY_PATH=$LD_LIBRARY_PATH:/usr/local/cuda-11.8/lib64
export PATH=$PATH:/usr/local/cuda-11.8/bin
export CUDA_HOME=$CUDA_HOME:/usr/local/cuda-11.8
添加后, source 重新加载一下,即可以看到安装的 cuda 版本
  NVIDIA-DRIVER-CUDA-CUDNN nvcc --version
zsh: command not found: nvcc
➜  NVIDIA-DRIVER-CUDA-CUDNN vim ~/.zshrc
➜  NVIDIA-DRIVER-CUDA-CUDNN
➜  NVIDIA-DRIVER-CUDA-CUDNN
➜  NVIDIA-DRIVER-CUDA-CUDNN
➜  NVIDIA-DRIVER-CUDA-CUDNN source ~/.zshrc
➜  NVIDIA-DRIVER-CUDA-CUDNN nvcc --version
nvcc: NVIDIA (R) Cuda compiler driver
Copyright (c) 2005-2022 NVIDIA Corporation
Built on Wed_Sep_21_10:33:58_PDT_2022
Cuda compilation tools, release 11.8, V11.8.89
Build cuda_11.8.r11.8/compiler.31833905_0
注:可以参考这篇文章来进行过个 cuda 版本的管理。
安装 CUDNN
目前我们安装的 cuda 是 11.8 版本,查看这篇文章可以看到对应需要的 cudnn 版本,我们这里 下载并安装安装 8.1.1 版本
➜  NVIDIA-DRIVER-CUDA-CUDNN sudo dpkg -i libcudnn8_8.1.1.33-1+cuda11.2_amd64.deb
Selecting previously unselected package libcudnn8.
(Reading database ... 195106 files and directories currently installed.)
Preparing to unpack libcudnn8_8.1.1.33-1+cuda11.2_amd64.deb ...
Unpacking libcudnn8 (8.1.1.33-1+cuda11.2) ...
Setting up libcudnn8 (8.1.1.33-1+cuda11.2) ...
Processing triggers for libc-bin (2.31-0ubuntu9.9) ...
➜  NVIDIA-DRIVER-CUDA-CUDNN sudo dpkg -i libcudnn8-dev_8.1.1.33-1+cuda11.2_amd64.deb
Selecting previously unselected package libcudnn8-dev.
(Reading database ... 195124 files and directories currently installed.)
Preparing to unpack libcudnn8-dev_8.1.1.33-1+cuda11.2_amd64.deb ...
Unpacking libcudnn8-dev (8.1.1.33-1+cuda11.2) ...
Setting up libcudnn8-dev (8.1.1.33-1+cuda11.2) ...
update-alternatives: using /usr/include/x86_64-linux-gnu/cudnn_v8.h to provide /usr/include/cudnn.h (libcudnn) in auto mode
➜  NVIDIA-DRIVER-CUDA-CUDNN sudo dpkg -i libcudnn8-samples_8.1.1.33-1+cuda11.2_amd64.deb

Selecting previously unselected package libcudnn8-samples.
(Reading database ... 195138 files and directories currently installed.)
Preparing to unpack libcudnn8-samples_8.1.1.33-1+cuda11.2_amd64.deb ...
Unpacking libcudnn8-samples (8.1.1.33-1+cuda11.2) ...
Setting up libcudnn8-samples (8.1.1.33-1+cuda11.2) ...
➜  NVIDIA-DRIVER-CUDA-CUDNN cat /usr/include/cudnn_version.h | grep CUDNN_MAJOR -A 2
#define CUDNN_MAJOR 8
#define CUDNN_MINOR 1
#define CUDNN_PATCHLEVEL 1
--
#define CUDNN_VERSION (CUDNN_MAJOR * 1000 + CUDNN_MINOR * 100 + CUDNN_PATCHLEVEL)

#endif /* CUDNN_VERSION_H */
安装 torch 和 tensorflow
安装 tenorflow 并确认是否可用
➜  ~ pip3 install tensorflow-gpu==2.10.0
Collecting tensorflow-gpu==2.10.0
...
  ~ python3 -c "import tensorflow as tf; print(tf.config.list_physical_devices('GPU'))"

2024-05-10 21:55:04.044654: I tensorflow/core/platform/cpu_feature_guard.cc:193] This TensorFlow binary is optimized with oneAPI Deep Neural Network Library (oneDNN) to use the following CPU instructions in performance-critical operations:  AVX2 FMA
To enable them in other operations, rebuild TensorFlow with the appropriate compiler flags.
2024-05-10 21:55:04.156741: E tensorflow/stream_executor/cuda/cuda_blas.cc:2981] Unable to register cuBLAS factory: Attempting to register factory for plugin cuBLAS when one has already been registered
2024-05-10 21:55:04.661505: W tensorflow/stream_executor/platform/default/dso_loader.cc:64] Could not load dynamic library 'libnvinfer.so.7'; dlerror: libnvinfer.so.7: cannot open shared object file: No such file or directory; LD_LIBRARY_PATH: :/usr/local/cuda-11.2/lib64
2024-05-10 21:55:04.661560: W tensorflow/stream_executor/platform/default/dso_loader.cc:64] Could not load dynamic library 'libnvinfer_plugin.so.7'; dlerror: libnvinfer_plugin.so.7: cannot open shared object file: No such file or directory; LD_LIBRARY_PATH: :/usr/local/cuda-11.2/lib64
2024-05-10 21:55:04.661570: W tensorflow/compiler/tf2tensorrt/utils/py_utils.cc:38] TF-TRT Warning: Cannot dlopen some TensorRT libraries. If you would like to use Nvidia GPU with TensorRT, please make sure the missing libraries mentioned above are installed properly.
2024-05-10 21:55:05.084535: I tensorflow/stream_executor/cuda/cuda_gpu_executor.cc:980] successful NUMA node read from SysFS had negative value (-1), but there must be at least one NUMA node, so returning NUMA node zero
2024-05-10 21:55:05.103192: I tensorflow/stream_executor/cuda/cuda_gpu_executor.cc:980] successful NUMA node read from SysFS had negative value (-1), but there must be at least one NUMA node, so returning NUMA node zero
2024-05-10 21:55:05.103398: I tensorflow/stream_executor/cuda/cuda_gpu_executor.cc:980] successful NUMA node read from SysFS had negative value (-1), but there must be at least one NUMA node, so returning NUMA node zero
[PhysicalDevice(name='/physical_device:GPU:0', device_type='GPU')]
➜  ~
安装 torch 并验证是否可以正确加载 gpu
➜  NVIDIA-DRIVER-CUDA-CUDNN pip3 install torch==1.13.1+cu116 torchvision==0.14.1+cu116 --extra-index-url https://download.pytorch.org/whl/cu116
Looking in indexes: https://pypi.org/simple, https://download.pytorch.org/whl/cu116
Collecting torch==1.13.1+cu116
  Downloading https://download.pytorch.org/whl/cu116/torch-1.13.1%2Bcu116-cp38-cp38-linux_x86_64.whl (1977.9 MB)
     |████████████████████████████████| 1977.9 MB 13 kB/s
Collecting torchvision==0.14.1+cu116
  Downloading https://download.pytorch.org/whl/cu116/torchvision-0.14.1%2Bcu116-cp38-cp38-linux_x86_64.whl (24.2 MB)
     |████████████████████████████████| 24.2 MB 11.7 MB/s
Requirement already satisfied: typing-extensions in /home/mintisan/.local/lib/python3.8/site-packages (from torch==1.13.1+cu116) (4.12.0)
Requirement already satisfied: pillow!=8.3.*,>=5.3.0 in /usr/lib/python3/dist-packages (from torchvision==0.14.1+cu116) (7.0.0)
Requirement already satisfied: requests in /usr/lib/python3/dist-packages (from torchvision==0.14.1+cu116) (2.22.0)
Requirement already satisfied: numpy in /home/mintisan/.local/lib/python3.8/site-packages (from torchvision==0.14.1+cu116) (1.24.4)
Installing collected packages: torch, torchvision
  WARNING: The scripts convert-caffe2-to-onnx, convert-onnx-to-caffe2 and torchrun are installed in '/home/mintisan/.local/bin' which is not on PATH.
  Consider adding this directory to PATH or, if you prefer to suppress this warning, use --no-warn-script-location.
Successfully installed torch-1.13.1+cu116 torchvision-0.14.1+cu116
➜  NVIDIA-DRIVER-CUDA-CUDNN python3 -c 'import torch; print(torch.cuda.is_available())'
True
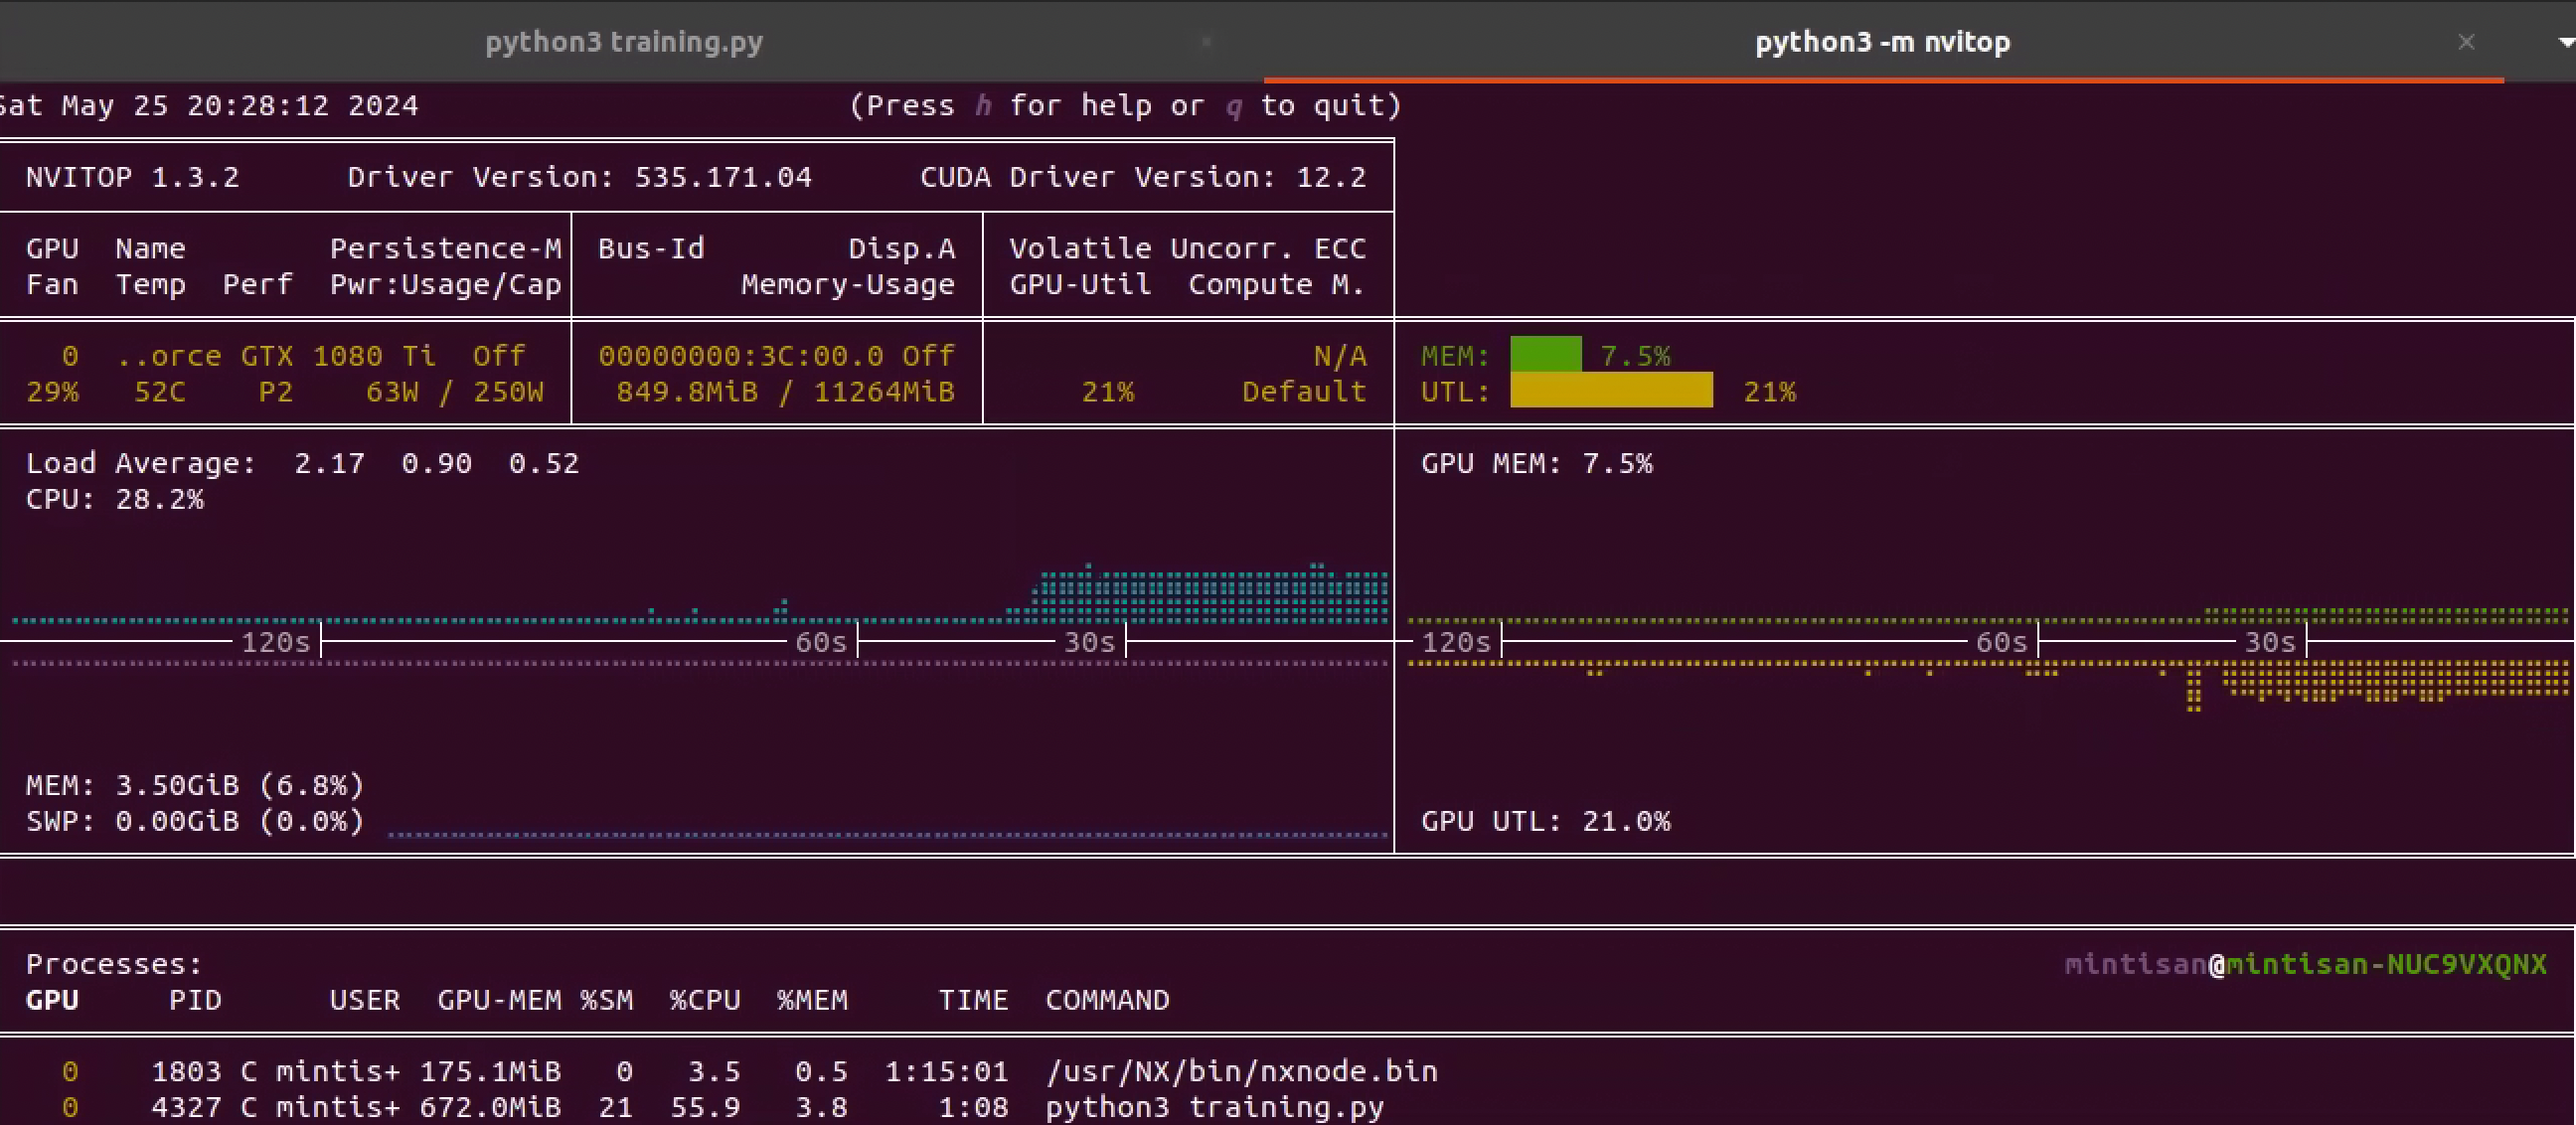
这里我们下载一个简单的 mnist demo 来进行训练测试看下 gpu 被使用。
安装 AIMET
在这里终于可以回答为啥之前的 torch 用那个版本,以及需要对应的 cuda 版本。。。
就是因为需要能用 AIMET,你可以在这里找到对 torch 以及 cuda 的版本。
➜  UbuntuApps pip3 install ./aimet_torch-torch_gpu_1.31.0-cp38-cp38-linux_x86_64.whl

Processing ./aimet_torch-torch_gpu_1.31.0-cp38-cp38-linux_x86_64.whl
Collecting protobuf==3.20.2
。。。
ERROR: Could not find a version that satisfies the requirement torch==1.13.1+cu116 (from aimet-torch==torch-gpu-1.31.0) (from versions: 1.4.0, 1.5.0, 1.5.1, 1.6.0, 1.7.0, 1.7.1, 1.8.0, 1.8.1, 1.9.0, 1.9.1, 1.10.0, 1.10.1, 1.10.2, 1.11.0, 1.12.0, 1.12.1, 1.13.0, 1.13.1, 2.0.0, 2.0.1, 2.1.0, 2.1.1, 2.1.2, 2.2.0, 2.2.1, 2.2.2, 2.3.0)
ERROR: No matching distribution found for torch==1.13.1+cu116 (from aimet-torch==torch-gpu-1.31.0)

➜  UbuntuApps pip3 install torch==1.13.1+cu116 torchvision==0.14.1+cu116 --extra-index-url https://download.pytorch.org/whl/cu116
Looking in indexes: https://pypi.org/simple, https://download.pytorch.org/whl/cu116
Collecting torch==1.13.1+cu116
  Downloading https://download.pytorch.org/whl/cu116/torch-1.13.1%2Bcu116-cp38-cp38-linux_x86_64.whl (1977.9 MB)
     |████████████████████████████████| 1977.9 MB 13 kB/s
Collecting torchvision==0.14.1+cu116
  Downloading https://download.pytorch.org/whl/cu116/torchvision-0.14.1%2Bcu116-cp38-cp38-linux_x86_64.whl (24.2 MB)
     |████████████████████████████████| 24.2 MB 5.5 MB/s
Requirement already satisfied: typing-extensions in /home/mintisan/.local/lib/python3.8/site-packages (from torch==1.13.1+cu116) (4.11.0)
Requirement already satisfied: pillow!=8.3.*,>=5.3.0 in /usr/lib/python3/dist-packages (from torchvision==0.14.1+cu116) (7.0.0)
Requirement already satisfied: requests in /usr/lib/python3/dist-packages (from torchvision==0.14.1+cu116) (2.22.0)
Requirement already satisfied: numpy in /home/mintisan/.local/lib/python3.8/site-packages (from torchvision==0.14.1+cu116) (1.24.4)
ERROR: torchaudio 2.3.0 has requirement torch==2.3.0, but you'll have torch 1.13.1+cu116 which is incompatible.
Installing collected packages: torch, torchvision
  Attempting uninstall: torch
    Found existing installation: torch 1.13.1
    Uninstalling torch-1.13.1:
      Successfully uninstalled torch-1.13.1
  WARNING: The scripts convert-caffe2-to-onnx, convert-onnx-to-caffe2 and torchrun are installed in '/home/mintisan/.local/bin' which is not on PATH.
  Consider adding this directory to PATH or, if you prefer to suppress this warning, use --no-warn-script-location.
  Attempting uninstall: torchvision
    Found existing installation: torchvision 0.18.0
    Uninstalling torchvision-0.18.0:
      Successfully uninstalled torchvision-0.18.0
Successfully installed torch-1.13.1+cu116 torchvision-0.14.1+cu116
➜  UbuntuApps python3
Python 3.8.10 (default, Nov 22 2023, 10:22:35)
[GCC 9.4.0] on linux
Type "help", "copyright", "credits" or "license" for more information.
>>>
>>> from aimet_torch.quantsim import QuantizationSimModel
Traceback (most recent call last):
  File "<stdin>", line 1, in <module>
  File "/home/mintisan/.local/lib/python3.8/site-packages/aimet_torch/quantsim.py", line 53, in <module>
    import aimet_common.libpymo as libpymo
ImportError: liblapacke.so.3: cannot open shared object file: No such file or directory
>>>
是因为少了一个库,参考这里的说明按安装 liblapacke-dev 后再导入就没有问题了。
➜  UbuntuApps sudo apt-get install liblapacke-dev
。。。
Setting up liblapacke:amd64 (3.9.0-1build1) ...
Setting up libtmglib-dev:amd64 (3.9.0-1build1) ...
Setting up liblapacke-dev:amd64 (3.9.0-1build1) ...
Processing triggers for libc-bin (2.31-0ubuntu9.9) ...
➜  UbuntuApps python3
Python 3.8.10 (default, Nov 22 2023, 10:22:35)
[GCC 9.4.0] on linux
Type "help", "copyright", "credits" or "license" for more information.
>>> from aimet_torch.quantsim import QuantizationSimModel
2024-05-25 20:52:34,923 - root - INFO - AIMET
>>>
这里记录下 torch 和 tensorflow 的版本。
➜  UbuntuApps pip list | grep torch
aimet-torch                  torch-gpu-1.31.0
torch                        1.13.1+cu116
torchvision                  0.14.1+cu116
➜  UbuntuApps pip list | grep tensorflow
tensorflow-estimator         2.10.0
tensorflow-gpu               2.10.0
tensorflow-io-gcs-filesystem 0.34.0
参考链接
- ubuntu 20.04 安装 cuda11.2 和cudnn8.2.1和pytorch1.10.0和tensorflow2.7.0(可能是最简单的安装方法,本人亲测成功)
- Ubuntu多版本cuda安装与切换
- How to uninstall the NVIDIA drivers on Ubuntu 20.04 Focal Fossa Linux
- Ubuntu Linux Install Nvidia Driver (Latest Proprietary Driver)
- ubuntu 系统 怎么判断系统有没有GPU
- https://developer.nvidia.com/cuda-toolkit
- https://developer.nvidia.com/cuda-12-2-0-download-archive
- 解决nvcc --version显示command not found问题
- https://www.tensorflow.org/install/pip?hl=en
- Tensorflow与Python、CUDA、cuDNN的版本对应表
- https://developer.nvidia.com/rdp/cudnn-archive
- https://www.nvidia.com/en-us/drivers/unix/
- https://www.nvidia.com/en-us/drivers/unix/linux-amd64-display-archive/
- Installing the NVIDIA driver, CUDA and cuDNN on Linux (Ubuntu 20.04)
- How to setup and optimize CUDA and TensorFlow on Ubuntu 20.04 — 2022
- ubuntu 22.04离线安装cuda 11.7.1、cudnn 8.9.3.28、nccl 2.18.3、tensorrt 8.6.1
- Installing the NVIDIA driver, CUDA and cuDNN on Linux (Ubuntu 20.04)
- AImet在ubuntu18.04上的安装步骤
- Issue with python install #433 : import libpymo ImportError: liblapacke.so.3: cannot open shared object file: No such file or directory